If you’ve ever updated your WordPress website only to find that the changes aren’t showing up, or if your site is running slower than usual, the culprit might be your cache.
In this guide, I’ll walk you through everything you need to know about WordPress caching and how to clear it effectively.
We’ll start by explaining what the WordPress cache is and why it matters for your website performance. Then, I’ll show you multiple ways to clear your cache depending on what tools you’re using, including step-by-step instructions for popular caching plugins, hosting platforms, and even your web browser.
By the end of this article, you’ll know exactly how to keep your WordPress site running smoothly and displaying the most up-to-date content.
Let’s get started with understanding what the WordPress cache actually is.
What Is WordPress Cache?
WordPress cache is a temporary storage system that saves copies of your website’s files to help it load faster for visitors. Instead of generating every page from scratch each time someone visits your site, caching creates static versions of these pages and serves them quickly.
There are two main types of caching that affect your WordPress site:
- Server-side caching: This happens on your web hosting server and stores pre-generated versions of your website pages. It reduces the need for your server to process PHP and query the database each time someone visits your site.
- Client-side caching: Also known as browser caching, this happens on your visitors’ devices. Their browsers save copies of your site’s images, CSS files, and JavaScript to load your site faster on repeat visits.
Both types of caching work together to speed up your WordPress site significantly. Server-side caching reduces the load on your server, while client-side caching reduces the amount of data that needs to be transferred to visitors.
When you make changes to your WordPress site—like updating content, changing your theme, or installing a new plugin—these cached versions might not update automatically. That’s when you need to clear your cache to ensure everyone sees your site’s most current version.
How To Clear Cache In WordPress?
There are many ways to clear your WordPress cache, depending on what caching plugin or CDN you’re using for your website. Let’s explore the most common methods one by one.
1. Through The WordPress Homepage
Some WordPress installations have cache management options built directly into the WordPress homepage. If you have installed a caching plugin on the WordPress website, it will show on the homepage.
Like, we are using the WP Rocket plugin, and the option is showing on the page itself.
You can simply click on the “WP Rocket” option and click the “Clear and Preload Cache” to clear cache in the blink of an eye.
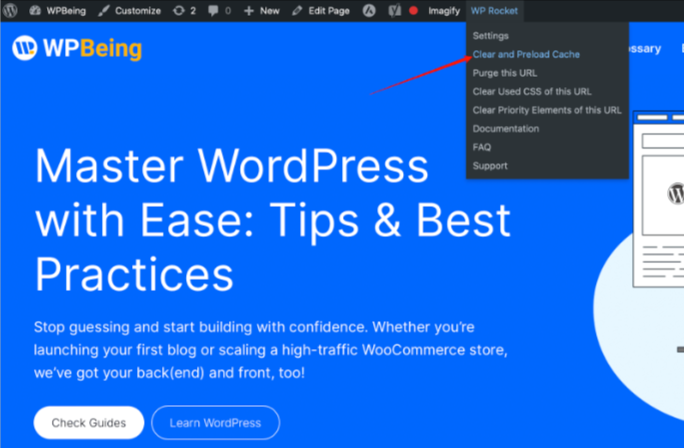
However, you must be logged into your WordPress admin dashboard. Otherwise, this option will not be visible.
2. Through WP Rocket
WP Rocket is one of the most popular caching plugins for WordPress, known for its user-friendly interface and powerful features. Here’s how to clear your cache with WP Rocket:
WP Rocket makes cache clearing very simple with its intuitive interface. When you need to clear your cache using this plugin, follow these steps:
Step 1. Log in to your WordPress admin dashboard
Step 2. Navigate to “Settings” > “WP Rocket” in the left sidebar menu
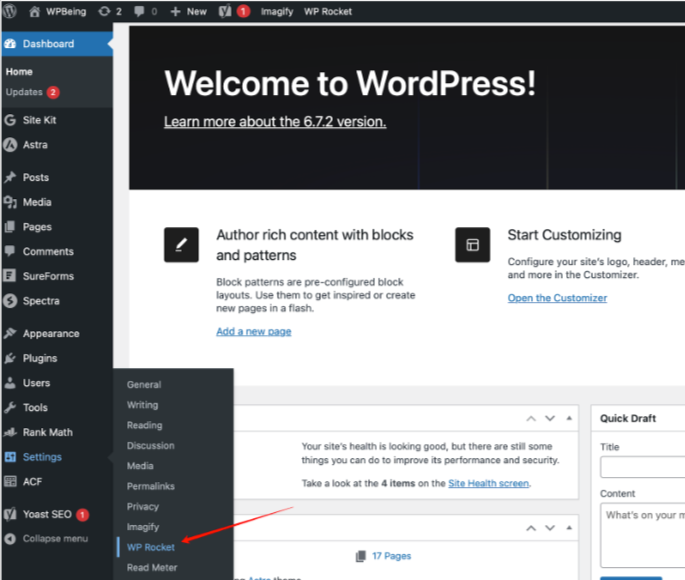
Step 3. At the top of the WP Rocket dashboard, you’ll see a prominent “Cache Files” option. Click “Clear and Preload” to clear all the cache files.
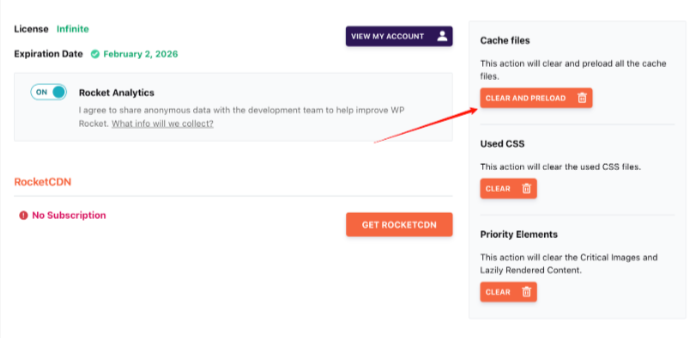
WP Rocket also allows you to clear specific types of cache if needed:
Step 1. Go to the WP Rocket dashboard as described above
Step 2. Instead of using the main “Clear Cache” button, scroll down to find options for clearing specific caches
Step 3. Choose whether to clear only the page cache, minified CSS/JS files, or other specific cache types
Step 4. Click the appropriate button for the type of cache you want to clear
What makes WP Rocket particularly useful is that it automatically clears the cache for a page when you update it, so you often don’t need to manually clear the cache after making changes to specific content.
3. Through LiteSpeed Cache Plugin
LiteSpeed Cache is another powerful caching plugin that comes pre-installed with many hosting providers, especially those running LiteSpeed web servers. Here’s how to clear your cache using LiteSpeed Cache:
The LiteSpeed Cache plugin offers multiple options for clearing different types of cache. When you need to refresh your site content, follow these steps:
Step 1. Log in to your WordPress admin dashboard
Step 2. Navigate to “LiteSpeed Cache” in the left sidebar menu
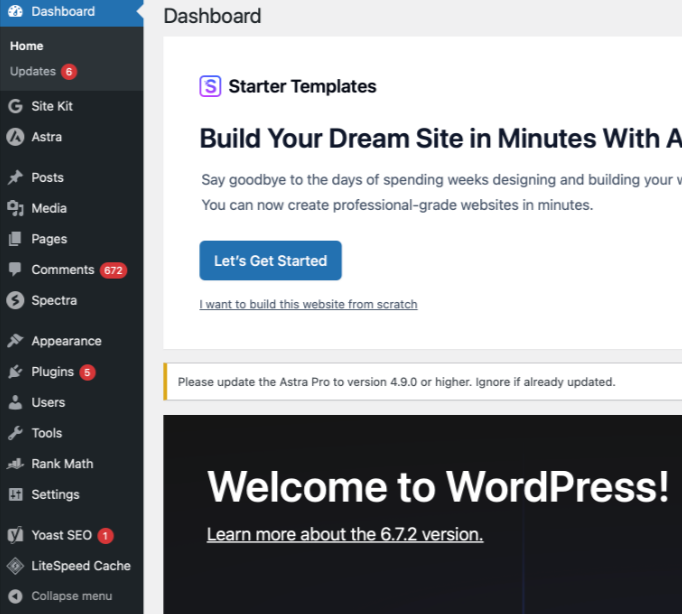
Step 3. Select the “Toolbox” option from the submenu
Step 4. In the LiteSpeed Cache Toolbox window, you’ll see various purge options
Step 5. To clear all caches, click on the “Purge All” button
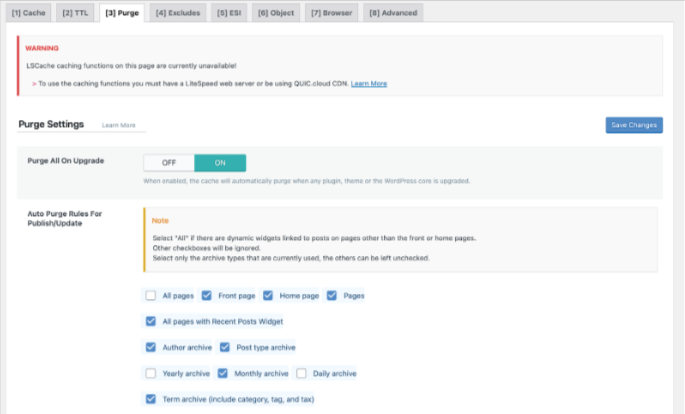
Step 6. For more specific cache clearing, you can select options like “Purge Page Cache,” “Purge CSS/JS Cache,” or other specific cache types
Step 7. Wait for the confirmation message indicating that the selected cache has been cleared
LiteSpeed Cache also allows you to clear the cache for specific URLs or content types:
Step 1. Go to the LiteSpeed Cache Toolbox as described above
Step 2. Scroll down to the “Purge By” section
Step 3. Enter the specific URLs, categories, or tags you want to clear cache for
Step 4. Click “Purge” to clear cache only for those items
4. Through Cloudflare
Cloudflare is a popular Content Delivery Network (CDN) that many WordPress sites use to improve performance and security. If you’re using Cloudflare, you’ll need to clear its cache separately from your WordPress caching plugins. Here’s how:
When you’re using Cloudflare as your CDN and need to clear its cache to see your site updates, follow these steps:
Step 1. Log in to your Cloudflare account dashboard
Step 2. Select your website domain from the list of sites
Step 3. Navigate to the “Caching” section in the top menu
Step 4. Click on “Configuration” from the submenu
Step 5. Scroll down to find the “Purge Cache” section
Step 6. You’ll see two main options: “Purge Everything” or “Custom Purge”
Step 7. To clear all cached content, click the “Purge Everything” button
Step 8. For more targeted cache clearing, select “Custom Purge” and specify which URLs you want to clear
Step 9. Wait for Cloudflare to confirm that the cache has been cleared
Cloudflare’s cache exists separately from your WordPress site’s server cache, so it’s important to clear both when making significant changes to your website. Keep in mind that it might take a few minutes for Cloudflare’s cache to fully clear across all their edge servers worldwide.
5. Through hPanel
If you’re hosting your WordPress site with Hostinger, you’ll have access to hPanel, their custom control panel that includes cache management features. Here’s how to clear your cache through hPanel:
Hostinger’s hPanel makes cache management straightforward with its dedicated Cache Manager tool. To clear your cache using hPanel:
Step 1. Log in to your Hostinger account and access hPanel
Step 2. Navigate to the “Advanced” section
Step 3. Click on “Cache Manager”
Step 4. You’ll see an option to toggle “Automatic cache” on or off
Step 5. Turn on the “Automatic cache” option if you want your cache cleared automatically every 30 minutes
Step 6. To manually clear all cache immediately, click the “Purge All” button
Step 7. Wait for the success message confirming that all caches have been cleared
hPanel also allows you to clear the cache for specific URLs:
Step 1. In the Cache Manager, look for the “Purge URL” field
Step 2. Enter the specific URL you want to clear cache for
Step 3. Click the “Purge” button next to the URL field
Step 4. Wait for confirmation that the cache for that URL has been cleared
This combination of automatic and manual cache-clearing options makes hPanel a flexible solution for managing your WordPress site’s cache.
How To Clear Cache From Your Browser?
In addition to clearing your WordPress site’s cache, you might also need to clear your browser cache to see the most recent version of your site. Browser caching stores website files locally on your computer, and sometimes these cached files can prevent you from seeing updates you’ve made to your site.
Here’s how to clear your cache in Google Chrome, the most widely used web browser:
Step 1. Open Google Chrome on your computer
Step 2. Click the three-dot menu icon in the top-right corner of the browser window
Step 3. Select “More tools” from the dropdown menu
Step 4. Click “Clear browsing data” from the submenu
Step 5. A new tab will open with the Clear browsing data window
Step 6. Set the time range to “All time” if you want to clear all cached data
Step 7. Make sure the checkbox next to “Cached images and files” is selected
Step 8. Click the “Clear data” button
Step 9. Wait for Chrome to finish clearing the cache
Step 10. Refresh the webpage you were viewing to load the most current version
For a quicker method, you can use the keyboard shortcut:
- On Windows/Linux: Press Ctrl+Shift+Delete
- On Mac: Press Command+Shift+Delete
This will take you directly to the Clear browsing data window, where you can follow steps 6-10 above.
Clearing your browser cache ensures that you’re seeing the most up-to-date version of your website and can be especially helpful when troubleshooting issues or checking recent updates.
Why You Should Clear Your WordPress Cache?
Clearing your WordPress cache regularly offers several important benefits for your website:
- See immediate updates: When you make changes to your website—like updating content, changing your theme, or installing new plugins—clearing the cache ensures these changes are visible right away. Without clearing the cache, you and your visitors might continue seeing outdated versions of your site.
- Fix display issues: Sometimes caching can cause visual glitches or formatting problems on your website. Clearing the cache often resolves these issues by forcing a fresh load of all page elements.
- Resolve functionality problems: If your website’s interactive features like forms, search functions, or comment systems aren’t working correctly, cached files might be interfering with their operation. Clearing the cache can restore proper functionality.
- Improve site performance: While caching generally improves performance, outdated or corrupted cache files can sometimes slow down your website. Periodically clearing and refreshing your cache ensures optimal performance.
- Ensure consistent user experience: Clearing your cache helps ensure that all visitors see the same, current version of your website, regardless of when they last visited.
- Aid in troubleshooting: When you’re trying to identify and fix website issues, clearing the cache eliminates cached files as a potential cause, making it easier to pinpoint the real problem.
- Free up server resources: Over time, cache files can accumulate and take up significant storage space on your server. Clearing old cache files helps free up these resources.
While caching is essential for good website performance, knowing when and how to clear your cache is equally important for maintaining an up-to-date, well-functioning WordPress site.
Related Reads:
Conclusion: Clear WordPress Caches In A Few Simple Steps
Clearing your WordPress cache is an essential maintenance task that ensures your website displays the most current content and functions optimally. As we’ve seen, there are multiple ways to clear your cache depending on what caching solutions you’re using—from dedicated caching plugins like WP Rocket and LiteSpeed Cache to hosting platforms like Hostinger’s hPanel and CDN services like Cloudflare.
Remember that different types of cache exist at different levels—from your WordPress server to your visitors’ browsers—and sometimes you need to clear cache at multiple levels to ensure everyone sees your site updates.

